

This article describes Redline in Email 3.0. Version 3.0 opens straight into an editor where your changes are tracked as you type. If your task pane instead opens on an “I want to…” menu, you are using version 2.1 or earlier: see Earlier versions of Redline in Email at the end of this article. To move to version 3.0, your IT administrator needs to deploy the version 3 add-in manifest and update Draftable to 26.9.0.1 or later. See Configuring Redline in Email.
How Redline in Email works
Redline in Email lets you mark up an email and review changes without leaving Outlook. Everything happens in one task pane:- When the pane opens, you see the email you are reading or writing, with its changes already marked up as tracked changes.
- You edit the email in the pane. Everything you type, delete or move is marked as a tracked change.
- You accept or reject changes, one at a time or all at once.
- You send the result on. When you are writing an email, Apply to Email puts the tracked result into your draft. When you are reading an email, Reply opens a reply draft that carries the tracked result.
Open Redline in Email
1
Open or reply to an email
To review an email you received, open it. To redline your own reply, open the email and select Reply (or Reply All) so you have a draft to work in. You can also open Redline in Email on a new email.
2
Select Redline
Select Redline on the Outlook ribbon. The Redline in Email task pane opens on the right-hand side.
- Classic ribbon: Redline is the only button in the Compare group. It is there whether you are reading or writing an email.
- Simplified ribbon: the group name is not shown, so look for the Redline button. If the Outlook window is narrow, it may be under the More options (…) menu.
- New Outlook and Outlook on the web: add-in buttons can also appear under Apps.
The Draftable button in the separate Draftable in Outlook group belongs to a different add-in, which sends text or attachments to the Draftable desktop app for comparison. This article covers the Redline task pane.
3
Wait for the editor to load
Redline in Email checks your Draftable license, finds the email to compare with, and opens the editor. This usually takes a few seconds.
What you see when the pane opens
The pane has four parts, from top to bottom:- The status line. It names what the marked changes are measured against, for example Changes: Alex’s email 22 July, 11:11 am ⇄ your draft. An email you sent yourself is named your email. The Settings (gear) and Help (question mark) buttons sit at its right-hand end.
- The review toolbar. Track changes, Accept, Reject, and the previous and next change buttons with the change count.
- The formatting toolbar. Bold, italic, underline, font, size, lists, links and tables.
- The editor, with Apply to Email or Reply at the bottom.
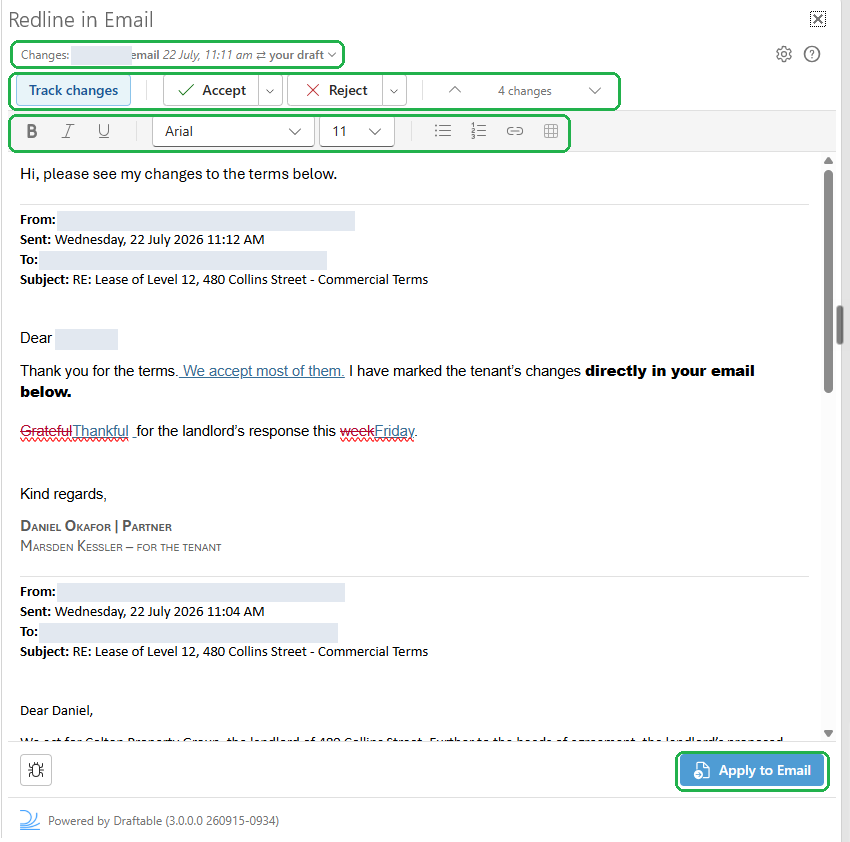
Which email your changes are compared with
- When you are writing a reply, Draftable compares your draft with the email you are replying to. If it cannot identify that email, for example on a forward, it uses the latest email in the conversation.
- When you are reading an email, Draftable compares it with the email before it in the conversation.
Compare with a different email
1
Open the comparison menu
Select the status line at the top of the pane (it shows a small arrow), then select Compare with an email…. The status line works as a menu when the email is part of a conversation.
2
Pick the email
The picker shows the email you have open at the top, marked with a This email or Your draft badge. Under Compare with, it lists the other emails in the conversation, newest first, with who sent each one, when, and the first line of what it added.Select an email to see the changes it would give in the Preview underneath the list, headed with the same Changes: line the status line would show. You can drag the divider to resize the list and the preview.When you are reading an email, any emails that arrived after it are folded into a row at the top of the list that counts them, for example 3 later emails. Expand it if you want to compare with one of them, and each one is marked After this email. If there is nothing to compare with, a line tells you there is no earlier email in the conversation.
3
Select Compare with this email
Select Compare with this email (or double-click the email in the list). The editor rebuilds with the changes measured against the email you picked.If you have already made edits in the pane, Redline in Email asks first, because the edits do not carry over to the new comparison. Select Discard edits to continue, or Keep editing to go back. Your email itself is not changed.To leave the picker without changing anything, select Back.
When you choose an email to compare with, any tracked changes already in your email are treated as accepted before the comparison runs, in the same way as Microsoft Word.
Start without a comparison
To stop comparing and simply edit the email with tracking on, select the status line, then select Start without a comparison. If you have edits in the pane, confirm with Discard edits, or select Keep comparing to stay where you are. The status line then reads Started without a comparison. You can pick an email to compare with again at any time.Edit with tracked changes
Edit the email in the pane as you normally would. With Track changes on (the default), your edits are marked for the next person to review:- Typing is marked as an insertion.
- Deleting is marked as a deletion.
- Moving text: cut the text (Ctrl+X) and paste it (Ctrl+V) where it belongs, and it is marked as a move.
- Retyping text you just deleted cancels the change word for word, so the text goes back to plain. Retyping only part of a word leaves it marked as a replacement.
- Link opens a dialog with Address and Text to display. Select Insert (or Update for an existing link). New link text is tracked like any other insertion.
- Table is available when your cursor is in a table. It offers Add row above, Add row below, Add column left, Add column right, Delete row and Delete column, and these changes are tracked.
Formatting changes such as bold, font and size are applied to the email but are not marked as tracked changes.
Review, accept and reject changes

1
Go to a change
Select a change in the editor, or use the up and down arrow buttons (Previous change and Next change) on the review toolbar. The counter between them shows how many changes there are, or which one you are on, for example Change 3 of 10.
2
Accept or reject it
When a change is selected, a small bubble appears next to it naming the type of change, with Accept change (✓) and Reject change (✕) buttons. Most changes read Insert or Delete. Moved text reads Moved from where it used to be and Moved to where it now is.You can also use the toolbar. Accept accepts the selected change and moves to the next one. Reject rejects the selected change and moves to the next one.
3
Accept or reject everything at once (optional)
Open the arrow on the Accept button and select Accept all changes, or open the arrow on the Reject button and select Reject all changes.
Send the redline
- When writing an email
- When reading an email
Select Apply to Email. The body of your draft is replaced with the tracked result from the pane, with the markup your recipient will see. Review your draft in Outlook, then send it as normal.You can keep working in the pane after applying, and select Apply to Email again to update the draft.

Outlook limits the size of an email body. If the tracked result is too large to apply to your draft, you see a message that the changes exceed Outlook’s 1MB limit for the email body. Your edits stay in the pane. The message also suggests applying a smaller selection or copying the changes. Version 3.0 has no Copy button and cannot apply part of a result, so ignore that part of the message. Shorten the email instead, or see Redline in Email workaround: create a text redline in Draftable Legal.
If the pane closes before you apply
Outlook can close the task pane without warning, for example when you select Reply in the Outlook message itself. To protect your work, Redline in Email saves your unsent edits in the pane as you go. The next time you open Redline in Email on the same email, a Saved draft message asks whether to continue. Select Continue draft to pick up where you left off, or Start fresh to discard the saved edits.
- Saved edits are kept for 24 hours on the computer where you made them, and are removed once you select Apply to Email or Reply.
- Images you pasted into the pane are not included in a saved draft. Images that were already in the email are.
- If Not autosaving appears on the review toolbar, your edits cannot be saved for recovery. Apply your edits before you close the pane.
Settings: include images in comparisons
Select the Settings (gear) button on the status line to open Settings. Compare images is off by default, and its description reads “Include image changes. This can slow compares, especially in large emails.” Turning it on includes image changes in the comparison. Select Back to return to the editor. If you change Compare images while a comparison is open and you have already made edits, Redline in Email asks whether to Rebuild comparison (your edits since the comparison opened are discarded) or Keep edits (the new setting applies to your next comparison).
Quick help and reporting a problem
Select the Help (question mark) button on the status line to open Quick help. It summarizes the workflow (See what changed, Make your edits, Accept and reject, Send it on) and has a Good to know section on moves, tables and Track changes. Select View full documentation to open this article, or Back to return to the editor.
Check your Redline in Email version
The footer at the bottom of the pane shows Powered by Draftable, followed by the version of Redline in Email in brackets, for example 3.0.0.0 260915-0934. Include the whole string, build stamp and all, when you contact support.Messages you might see
Redline in Email not working for a text change? If the panel will not load, you hit a message size limit, or the redline will not apply to your email, you can build the redline manually in Draftable Legal and paste it into your email. See Redline in Email workaround: create a text redline in Draftable Legal.
What changed from version 2.1
If you used an earlier version of Redline in Email, this is how the familiar actions map to version 3.0:Earlier versions of Redline in Email
Show the guide for Redline in Email 2.1
Show the guide for Redline in Email 2.1
These instructions apply only if your task pane opens on the “I want to…” menu. Version 2.1 drives everything from one menu that adapts to what you are doing: Compose actions when you are writing a reply, and Read actions when you are reviewing a received email.Accept or reject changes is the one action available in both modes. The menu also has Settings and How to use Redline in Email (quick help).Applying is a one-time action per preview. If you keep editing after applying, run Redline my changes again to get a fresh, synced preview.


Opening Redline in Email (2.1)
1
Open or reply to an email
To review a received email, open it. To redline your own reply, open the email and select Reply (or Reply All) so you have a draft to work in.
2
Launch the add-in
On the Outlook ribbon, open Apps (the apps launcher) and select Redline in Email. The Draftable task pane opens on the right-hand side.
The Redline in Email menu (2.1)
The task pane opens on the “I want to…” menu. The actions available depend on whether you are reading or composing, so options that do not apply are greyed out (hover a greyed action to see why).- When composing a reply
- When reading an email
The Compose actions are active: Redline my changes (“Show the changes that you have made to the current email.”) and Redline my selection (“Redline only the selected text in your email.”). Accept or reject changes is also available.

Redline my changes (2.1)
1
Edit your reply, then select Redline my changes
Make your edits in the reply, then choose Redline my changes. Draftable compares your draft (including the conversation history below your reply) against the baseline email and shows a redline of your changes, with deletions struck through and insertions underlined. The totals for changes, insertions, and deletions appear beneath the preview, and the Synced with email badge means the preview updates automatically as you keep editing.
2
Apply or copy the redline
Select Apply to Email to write the redline into your reply. Once applied, the change appears as markup in the email body and the badge changes to Not synced, because the email now contains the redline and the preview no longer tracks further edits. To copy the redline instead of applying it, use Copy.
Redline my selection (2.1)
1
Select the text, then choose Redline my selection
Highlight the text you want to redline in the email body first, then choose Redline my selection. The preview shows a redline of just that selection. If you run it without selecting anything, the pane prompts you: “No content selected. Please select text before running Redline.”
2
Show surrounding context (optional)
Select Show surrounding context (the eye button beneath the preview) to see the selection within the wider email, with the surrounding text greyed out. Select Hide surrounding context to return to just the selection.
Compare against an earlier email (2.1)
1
Choose Compare against an earlier email
Open the received email and select Compare against an earlier email. Draftable compares it against the previous version in the conversation (including the conversation history) and marks every difference, with the totals shown beneath the preview.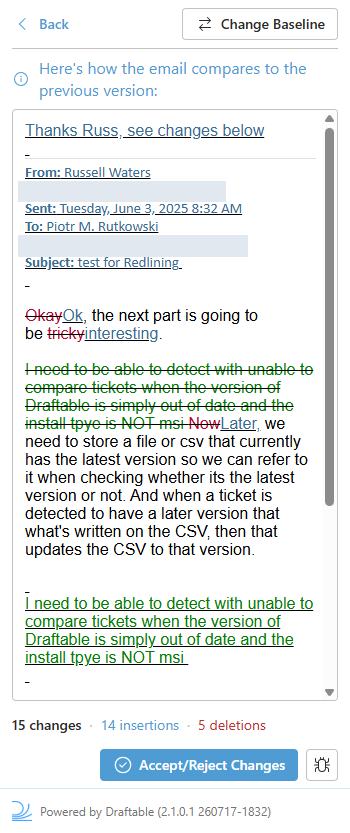
2
Change the baseline (optional)
Select Change Baseline (“Change the older email being compared against.”) to compare against a different earlier email. Choose the email you want, then select Select This Email.
3
Move on to Accept or reject changes
When you are ready to work through the changes, select Accept/Reject Changes.
Accept or reject changes (2.1)
Select a change in the preview, then use the toolbar to accept or reject it. A counter tracks your progress: the current change, how many you have accepted and rejected, and how many remain.Undo is greyed out until you accept or reject at least one change. As you accept or reject, the counter updates and the selection advances to the next change automatically.
Copy, Apply, and Create New Email (2.1)
- Copy copies the preview to your clipboard so you can paste it into an email. If you have selected text within the preview, Copy copies only that selection (the button reads Copy selection). After copying, Draftable reminds you to paste using Keep Source Formatting so the markup is preserved.
- Apply to Email (compose) writes the finished redline into your reply.
- Create New Email (read) opens a new email containing your accepted and rejected changes.
Settings and quick help (2.1)
Open Settings from the menu to control whether images are compared. Compare images is off by default.